Via the HubEngine, leads generated via the “Facebook Lead Ads” can be synchronised very easily and directly into other systems. Other systems can be, for example, “Sales Clouds” or “Marketing Automation Applications” like Salesforce, HubSpot or SAP C4C. In the sales clouds, the leads are processed directly and in the marketing solutions they are usually transferred into nurturing campaigns.
You can find a full list of integration plans here: HubEngine Integration Plans for Facebook.
Setting up a sync plan takes just a few clicks via HubEngine. You can find a guide to plan configuration here: How to configure an integration plan in HubEngine
In order to obtain the Facebook API key (Access Token), which you need to establish the connection between Facebook and HubEngine, the following steps must be completed.
Request Facebook Access Token
1. Set up Facebook Developer Account
Generally, a Meta for Developers account developers.facebook.com is required. This can be easily created from an existing Facebook profile. The Meta for Developers user also needs access to the page from which the leads are generated.
2. Set up Facebook App and generate Token
- First, open “My Apps” in Meta for Developers developers.facebook.com/apps/.
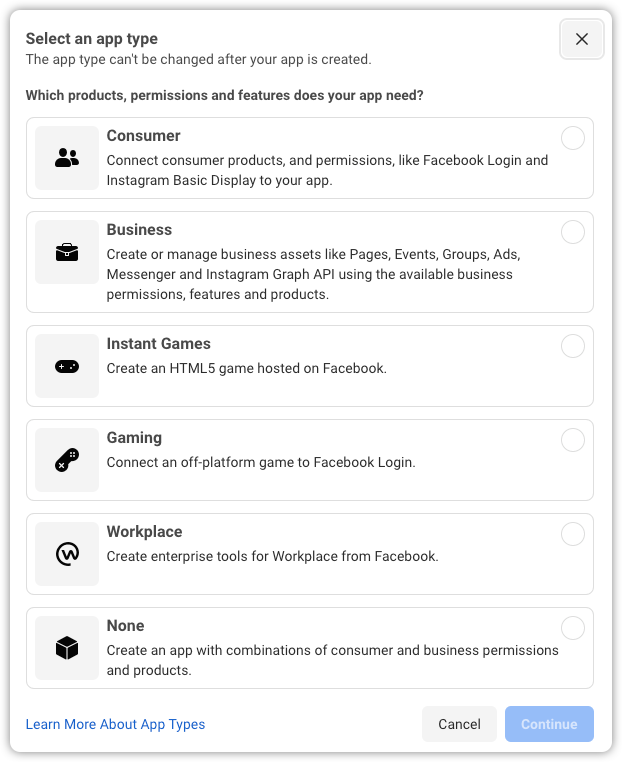
- Then select “Create App” (“Other” and “Business”).
- Afterwards, data such as “Name of the app”, “Email” and a Company Account must be added.
- After the creation you have to go into the app and via the side navigation to Settings -> General
- App ID and app secret code must be copied and saved. The secret code is generated via “Show”. The data is needed to set up the synchronisation.
- Then go to the “Graph API Explorer” via Tools and select “Add permissions”.
- In the Permissions section, the following permissions must be added (selectable via the search):
- ads_management
- pages_read_engagement
- pages_show_list
- leads_retrieval
- pages_manage_ads
- Then select “Generate Access Token” again. In the window that opens, you must tick all permissions. If you manage several pages, you must also select the pages for which the permissions apply (you can also select more than one).
- Select the corresponding Facebook page via User or Page (one page is sufficient if multiple pages were selected in the previous step) and then click “Generate Access Token” again.
Since the permissions and the setup can basically change and we have no influence on this, we always recommend taking a look at Meta’s official documentation.
3. Extend expire date of the Access Tokens
By default, the Facebook Access Token expires after one hour and must therefore be extended. The following steps are necessary after setting up the app:
- Open the Access Token Debugger via Tools.
- Enter the Access Token and select “Troubleshoot”.
- Scroll to the end and click on “Extend Access Key”.
- Then select Debug and copy and save the new Access Token.
The new code is then valid for two months (Facebook regulation). You should put a reminder in your calendar and renew the code again after two months. If this does not work immediately, the process must be repeated from step 9 onwards.
4. Activation of the App
If you want to synchronise live data, the app must be activated beforehand. To do this, you must set the app mode from Development to Live in the overview of the app (Dashboard).
To do this, it is mandatory to store a URL to the privacy policy under the general settings.
In addition, you must request “extended access” for the requested permissions under 1. To do this, go to Permissions and Features under App Review. Then select “Request extended access” for the corresponding permission. For this to work, a first test lead must already have been successfully retrieved via the app.
5. Data Access
For final access to the data, the advertising account through which the advert runs must be added as an asset in the Meta Business Manager under Company settings -> Accounts -> Apps.
Configure HubEngine Plan
If you want to use the Facebook Leads Adapter, you must enter the following information during authentication in HubEngine:
- App ID
- App secret key
- Access Token
- Form ID
In principle, all fields that were configured in the Facebook Lead form can be synchronised in the connected systems via the mapping of the HubEngine.
For the initial retrieval of the fields, it is necessary to create a test lead. There is a Test-Tool.