When you configure a HubEngine plan, you should test it before you synchronize two complete systems. This is especially often the case when you set up your first plan at all.
A prerequisite for testing is that you have access to the two systems you are synchronizing. So you can create and delete records in them for testing purposes.
The following configurations for testing are only recommendations and serve as a general understanding of how you can test if you do not want to fully implement synchronization directly. The example is based on the minimum configurations for testing. You can of course extend the configurations gradually until you reach the final requirements (e.g. triggers, conditions, actions).
Unidirectional synchronization
We consider a unidirectional synchronization of personal data from system A to system B. Your data could look like this in the system, for example (we take a very reduced example):
System A
| ID | Last_Name | E_Mail |
|---|---|---|
| 1 | Johnson | johnson@info.com |
| 2 | Jane | jane@info.com |
We assume the same field names for system B, the mapping would look accordingly as follows:
- Last_Name : Last_Name
- E_Mail : E_Mail
In order to test whether the synchronization works in general, we set the Trigger option to “manually” for the time being.
Also for the mapping we recommend to use a reduced mapping for testing, i.e. to synchronize only 1-2 fields.
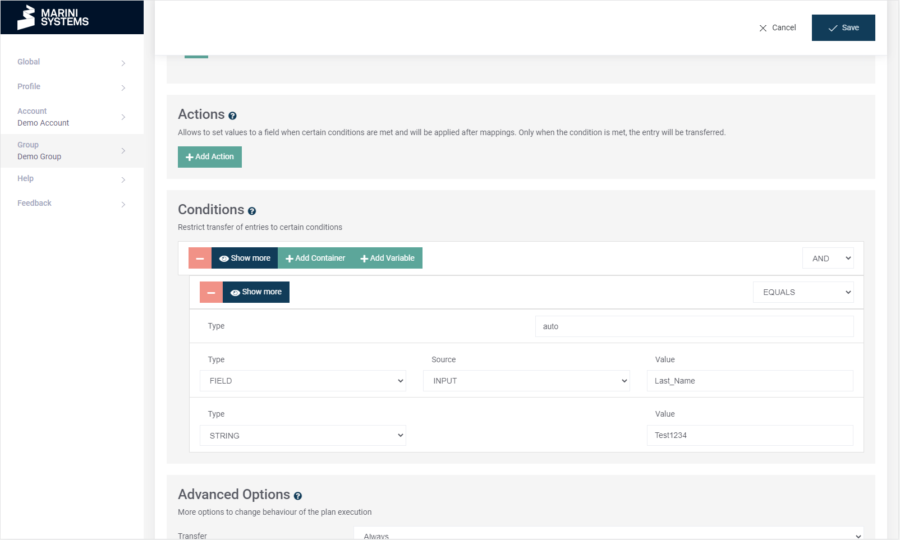
So that you do not randomly synchronize changed records (then you could also directly set up your final configurations), we add a condition that is exclusively for testing!
You should set a condition which
- you can set easily and
- is formulated very pointedly
so that only records you create for test purposes are synchronized. A very simple condition could be:
- Name == “Test1234”
You configure the condition in the HubEngine like this:
When you finally activate the plan, nothing happens if you have only set a manual trigger.
Now you create a record in system A that fulfills the defined condition. In our case we create the record with the ID “3” (the entered e-mail address does not matter):
| ID | Last_Name | E_Mail |
|---|---|---|
| 1 | Johnson | johnson@info.com |
| 2 | Jane | jane@info.com |
| 3 | Test1234 | test@test.com |
We recommend to proceed like this:
- Activate your plan with Debug Mode
- Enter a record in system A (see table above) that meets the condition
- Trigger your plan manually
- Wait until the plan execution is finished
- Check if the record has been created in system B correctly
If this runs successfully, you can finish configuring your plan gradually or all at once. With this principle you can also approach the final configuration. You can choose the increments yourself. If the synchronization does not work, you can read more in the logs.
Bidirectional synchronization
To test a bidirectional synchronization, you can do the same as for unidirectional synchronization. Set up an appropriate condition to also control your test record in system B.
For example, if you have mapped two fields, you could use the other field for the condition in the other system. In our case we define the following condition in system B:
- E_Mail == “mytest@test.com”
You can now proceed in such a way that you go through steps 1-5 from the unidirectional synchronization. If you have successfully reached step 5 and the record has been created in system B, these following steps make sense next:
- Change the field of your record in system B to which the condition applies (in our example we change the mail address to “mytest@test.com”)
- Trigger your plan manually
- Wait until the plan execution is completed
- Check if the record has been updated accordingly in system A (i.e. the email address is now “mytest@test.com”)
You can of course also perform steps 1-5 from the unidirectional synchronization, each starting with a separate record in system A and B respectively. You do not need to use the same record.
In a nutshell
The configurations shown for testing your plan are only examples and should be understood as recommendations. You can also test your plan more extensively and more similar to the final configuration. This article should help you understand the concept of testing.
To summarize, in the most minimal version, you can test a plan with the following configurations:
- reduced mapping
- manual trigger
- simple and pointed condition
